Cloudflare is an internet security company that has expanded rapidly since 2014, thanks to its success in protecting websites from hacker attacks. The company started up in 2009 and has expanded constantly. In a very short period, Cloudflare has established an impeccable reputation as a world leader in cybersecurity. In 2018, the company extended its activities to provide a privacy-driven DNS service to the public.
Changing browser settings
The IP address of the Cloudflare DNS service is 1.1.1.1, which is very easy to remember. You just need to go into the network properties of your browser to get access to the service. You do not have to pay anything or create an account.
Cloudflare DNS on Windows
The browser type that you use doesn’t matter because the DNS setting is a property of your network, over which all browsers connect to the internet.
Step 1: Get to the network properties
- Open the Start menu and click on the cog symbol, just above the shutdown button. This will open the Windows Settings system.
- Click on Network and Internet to get to the Network Settings page. Click on Change adapter options. This will open a list of network connections.
- Right-click on the network you use to connect to the internet and select Properties from the context menu.

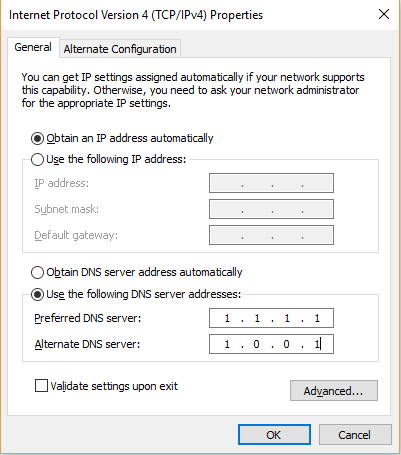
Step 2: Set up DNS for IPv4
- In the connection properties window, look to see if the line Internet Protocol Version 4 (TCP/IPv4) is checked. If so, click on that line once and then press the Properties button. This will open another window.
- If there are values in the DNS fields, write them down in case you need to rollback to your current settings.
- Click on the Use the following DNS server addresses radio button.
- Enter 1.1.1.1 in the Preferred DNS server field.
- Enter 1.0.0.1 in the Alternate DNS server field.
- Click on the OK button and then click on Close in the connection properties window.
- Restart your browser to get it to use the Cloudflare DNS service.
Step 3: Set up DNS for IPv6
- If the line Internet Protocol Version 6 (TCP/IPv6) is checked in the connection properties screen, click on the line and press the Properties button. This will open another window.
- Note down any current values in the DNS fields if there are any. You may need to return to these settings at a later date.
- Click on the Use the following DNS server addresses radio button.
- Enter 2606:4700:4700::1111 in the Preferred DNS server field.
- Enter 2606:4700:4700::1001 in the Alternate DNS server field.
- Click on OK to close the protocol properties window and then press the Close button in the connection properties window.
- Restart your browser to get it to use the Cloudflare DNS service.
Cloudflare DNS on macOS
Setting up the Cloudflare DNS on Macs is very straightforward.
- Open System Preferences
- Perform a search for DNS Servers. Click on that entry in the results list.
- Click on the + symbol to add a new DNS record. Enter 1.1.1.1
- Click on the + symbol again and enter 1.0.0.1 this time.
- Click on OK and then click Apply.
- Restart your browser to get the new DNS settings active.
Cloudflare DNS on Linux
These instructions are for Ubuntu. However the steps are almost identical for all flavors of Linux.
Step 1: Get to the network settings
- Look for the Applications icon in the left-hand menu. This symbol looks like a Rubik’s cube.
- Click on Settings and select Network.
- Look in the right-hand panel for your regular internet connection. Click on the cog icon.
Step 2: Set the DNS for IPv4
- In the connection settings screen, click on the IPv4 tab.
- In the DNS settings, move the Automatic slider to Off.
- Enter 1.1.1.1 and 1.0.0.1 in the two DNS address fields.
- Click on Apply.
- Restart your browser to get the changes to take effect.
Step 3: Set the DNS for IPv6
- In the connection settings screen, click on the IPv6 tab.
- In the DNS settings, set the Automatic slider to Off.
- Enter 2606:4700:4700::1111 and 2606:4700:4700::1001 in the two DNS address fields.
- Click on Apply.
- Restart your browser to get the changes to take effect.
Cloudflare DNS on Android
At present, Android devices only use IPv4 addresses. You need to be connected to the network that you want to change the DNS settings for.
- From the top of the screen, swipe down to get the settings bar to expand. Tap on WiFi. Tap on More Settings at the bottom of the list of available networks.
- Long-press on the name of your current network. Tap Modify Network in the popup that appears.
- Tap on Advanced options in the next screen and then tap on IP settings and select Static.
- Scroll down to the fields DNS1 and DNS2. If these fields have the values in them, note them down in case you want to return to your original settings.
- For DNS1 enter 1.1.1.1 and in DNS2 enter 1.0.0.1.
- Tap on Save.
Cloudflare DNS on iOS
Just like Android, iOS only uses IPv4 addresses.
- Tap on Settings in the Home screen. Select Wi-Fi from the Settings screen.
- In the Wi-Fi screen tap on the right-arrow next to the name of your internet connection.
- Tap Configure DNS and then Manual.
- If any DNS entries exist, note them down and then delete them.
- Tap on + Add Server. Enter 1.1.1.1 for the address value.
- Tap on + Add Server. Enter 1.0.0.1 for the address value.
- Tap on Save.
Cloudflare DNS considerations
Cloudflare will become a major rival to Google’s DNS service. Given Google’s major income stream from retargeted advertising, it is wise to be a little cautious about how its DNS service treats your privacy. However, there is no evidence that Google uses the transaction data from its DNS service to aid its targeted marketing business.
Although Cloudflare makes major claims about its integrity on protecting your privacy, it does have a small skeleton in its closet. The company doesn’t actually own the 1.1.1.1 IP address. That very distinctive address is on loan from APNIC, which is the non-profit IP address distribution authority for the Asia Pacific region.
As part of the deal that Cloudflare did with APNIC, all DNS access records are available to APNIC for research purposes. However, Cloudflare declares that the IP addresses of the customers that access the 1.1.1.1 DNS service are not available to APNIC, so no one identity is ever traceable. Cloudflare and APNIC are working together on a DDoS protection research project that relies on the aggregated DNS access data.
Another concern with the security of the Cloudflare DNS service arises from the Cloudbleed exploit discovered in 2017. This was a coding error in Cloudflare’s software that would enable hackers to get access to the usernames and passwords of the visitors to sites protected by Cloudflare. This problem was fixed by the company. However, although Cloudflare may have a very strong ethical stance on the protection of your privacy, new flaws in its software could expose your details to hackers and government security agencies anyway.
One very surprising fact about the Cloudflare DNS service is that just putting its 1.1.1.1 address in your network settings does not provide any security at all. Communications between your browser and the Cloudflare server is unencrypted and just as visible to your ISP as connections to Google’s DNS server or the Cisco OpenDNS.
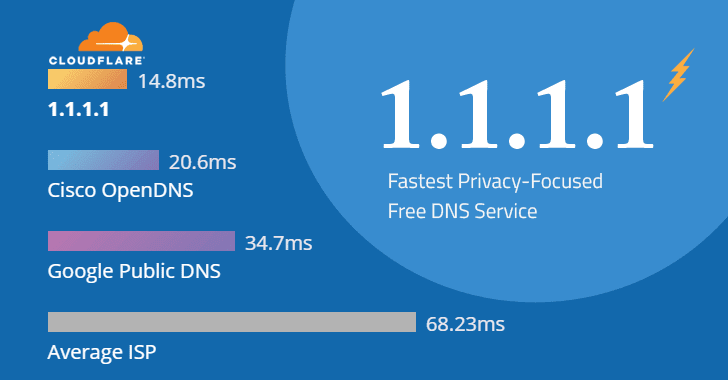
Cloudflare claims that tests by DNSPerf show its DNS servers’ response times are much faster than the most commonly used DNS services of Google and OpenDNS. So the major benefit that Cloudflare offers over its rivals isn’t privacy or security — it is speed.
Here are some DNSPerf tests results comparing the response speeds of Cloudflare DNS to Cisco OpenDNS, Comodo DNS, and Google DNS:
| DNS Service | Primary IP Address | Alternative IP Address | Response Time |
| OpenDNS | 208.67.222.222 | 208.67.220.220 | 20.5 ms |
| Comodo DNS | 8.26.56.26 | 8.20.247.20 | 72.7 ms |
| 8.8.8.8 | 8.8.4.4 | 34.16ms | |
| Cloudflare | 1.1.1.1 | 1.0.0.1 | 12.78 ms |
Secure DNS transactions
The 1.1.1.1 DNS system does have encryption capabilities. However, these are not applied automatically because both sides in a secure connection need to be working with the same protocols, and browsers do not encrypt for DNS calls.
There are three secure DNS protocols that would enable your browser’s DNS calls to be encrypted. You would need to find out which secure protocols your chosen DNS server can handle and then implement that system on your computer. Here are some of the most widely used DNS servers and the security protocols that they can implement.
| DNS Service | DNSCrypt | DNS resolution over TLS | DNS resolution over HTTPS |
| Cisco OpenDNS | Yes | Yes | No |
| Google DNS | No | Yes | Yes |
| Quad9 | No | Yes | No |
| Cloudflare | No | Yes | Yes |
| CleanBrowsing | No | No | Yes |
So you can use Cloudflare securely and block your ISP or any security agencies gathering information on the sites you visit. However, you would have to install a DNS resolution over TLS system or a DNS resolution over HTTPS package. Unfortunately, these encryption standards for DNS traffic are new and still being developed. Browser producers are interested in the concept of secure DNS transactions and have teams working on developing those capabilities, but there are no signs that these advancements are nearing completion.
Cloudflare DNS
Although there seem to be some speed advantages to using the Cloudflare DNS system, it offers no security advantages over its rivals. Until browsers start to build in secure DNS messaging, your best option to protect your privacy is to install a VPN. Once browsers gain secure DNS capabilities, then all of the major DNS services will be able to protect your privacy, not just Cloudflare.
If you want to take the VPN route to protect the privacy of your DNS transactions, be careful. Not all VPNs will protect you sufficiently. Some VPN services allow your computer to continue using its default DNS service, which lets outsiders see the unencrypted requests for web server addresses. This situation is called a DNS leak. Check out the more advanced VPNs and look into securing your browser against viruses, hackers and snoopers. One day, your DNS transactions will be secure. Until then, not even Cloudflare can protect